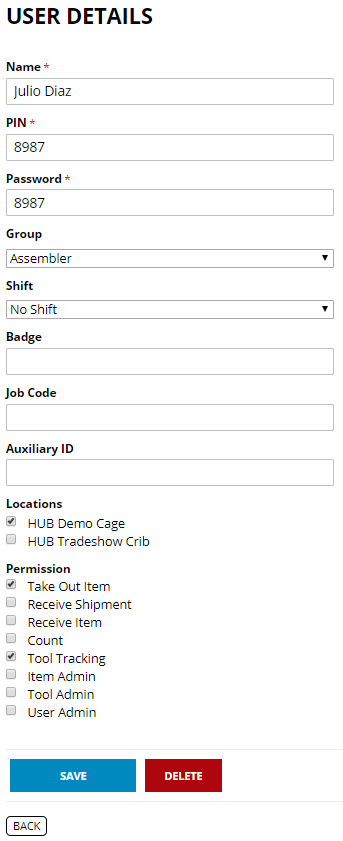
Setting up a new user is a two-step process. An administrator starts the process by creating a user in the IQ app within www.hubindustrial.com. Once this basic information is loaded into the system, then the administrator will meet the new user at the authentication device and program the new user’s biometrics into the device, after which time the new user will have the ability to enter the store room and use the features assigned to him/her.

The fields marked with a red asterisk are required.
The PIN must be a unique 4-digit number. The Password must also be a 4-digit number, but it does not have to be unique. It can be the same as the PIN, or you could assign the same password to multiple people.
Anyone knowing a PIN and Password of a user could gain entry to the store room by inputting those numbers into the controller, so it is advisable not to give out these codes. If for any reason you would want to be able to grant access to anyone not registered as a user, you may wish to set up a “burner” user account with a memorable set of codes that you can offer to a temporary user with the option to change the code later.
The other fields are optional. It can be useful to assign the users to groups. For example, you can view reports filtered by groups of employees, or if you set up a subscription that generates an email to a supervisor every time a certain event triggers it, you can direct the email to different recipients depending on the employee group the user who triggered the event belongs to. To learn how to restrict a user’s access to certain times of the day, see the tutorial on SHIFTS.
The check boxes at the bottom of the page will determine the level of access the user has. You will have to weigh the benefits and liabilities of checking more boxes for a user; you don’t want to needlessly restrict access that prevents access for the user to perform an unforeseen task, but at the same time you would not want to give unbridled access to all users, either. Any Admin box you check will give the user the ability to make changes and even designate other users as administrators, so you should be especially careful to limit the number of people with that level of permissions.
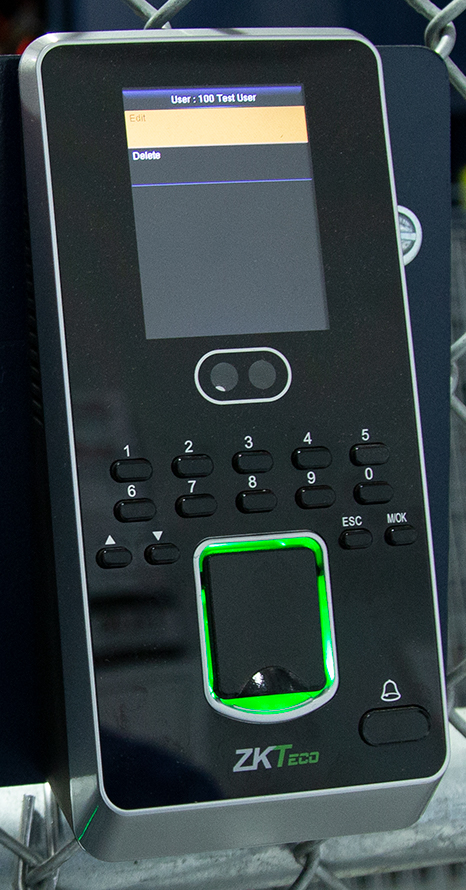
To register a user to the access control box, begin by pressing the M/OK button. To enter the control menu you must authenticate yourself before registering the new user. Only people with User Admin permission can access the menu on the access control box.

The controller screen is not touch sensitive, so you have to navigate the menus using the buttons on the keypad. The up and down arrow buttons will allow you to navigate around the screen, and the ESC and M/OK button will move you backwards and forward one page with each click. The number buttons can also be useful in page navigation in certain pages.
Facial recognition and fingerprints are both effective biometric authentication methods; users can use the method that is most convenient to them. To register fingerprints, you can choose to register up to 10 using the graphic map on the screen to select which finger on which hand you are registering. You can navigate to the finger you wish to register using either the arrow buttons or the numbers. The selected finger will be indicated in red; all fingers already registered will be shaded green. When you have the desired finger selected, press the M/OK button to enter the registration mode and follow the instructions that appear on the screen as well as the audio confirmation. Once a fingerprint registers, you will see the menu page with the Fingerprint option still highlighted. You may press M/OK to register another finger, navigate to facial recognition, or hit ESC repeatedly until you are back at the home screen.
