It is possible to limit users’ access to the supply room to only those hours they are expected to be on the clock. Why would you want to do this? It is a tool available to better manage workplaces that are concerned with users accessing the supply room when they are not working to prevent misuse.
Users of this feature should be mindful that shift restrictions can be disruptive if a user ever has a legitimate reason to access the supply room at an unexpected time. Examples of times when users would need to access the supply room outside of their normal working hours would be:
- If they fill in for another coworker on a different shift
- If overtime hours are periodically encouraged during peak seasons
- If a user is reassigned to a different shift
When users are denied access to the store room because the access attempt is outside the shift times, an “X” will display on the access device screen accompanied by the text “Error: Invalid time period” as well as an audible cue: “Invalid time period.”
SET UP SHIFTS
To assign users to shifts, you first must create the shifts in the USER SHIFTS
page on the desktop app.
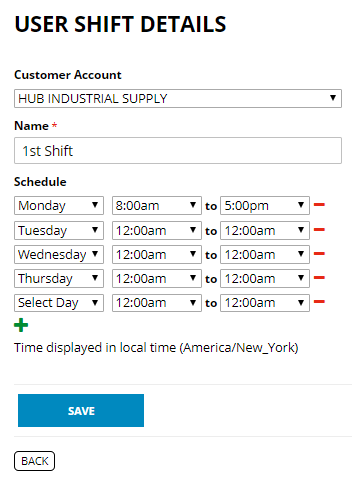
Click the ADD NEW SHIFTS button to open up the USER SHIFT DETAILS PAGE. Verify that the Customer Account field is displaying the correct account, and then create a name for your shift, such as 1st Shift.
Underneath the Name field is a green “+” symbol. Click the symbol to add shift times. Click the symbol as many times as necessary to include all the times on the shift for every applicable day in the shift. Select days and times using the dropdown options in each field. Each line that you add permits access during the time span between the times you select. Make sure the time listed in the box on the right is later than the time listed on the box on the left. If you want to restrict access during lunch break, you will have to create a line for the time span before lunch, and another line for the time span after lunch.
You can create as many lines as required to specify the authorized times for each day of the week. If you create more lines than you need, lines are deleted by selecting the red “-“ symbol on that line.
Times are adjusted to the time zone where your computer is located.
When you have defined your shift, click SAVE.
ASSIGN USERS
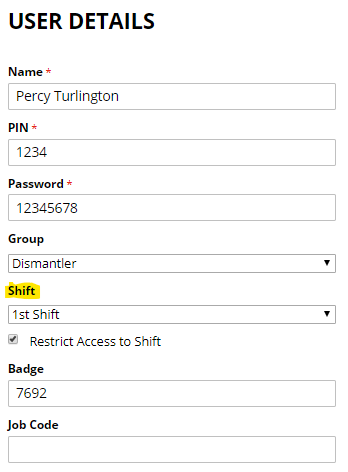
Select USERS from the dashboard of your Inventory IQ desktop app. Select each
user individually using the edit item pencil icon to the right of the name on USERS
page. In the USER DETAILS page, use the drop-down menu under “Shift” to assign
a shift from the available choices you have previously created.
Be sure to check the box marked “Restrict Access to Shift.” If you ever need to temporarily remove restrictions, you can uncheck this box without having to remember which shift to assign when the restrictions are re-imposed.
Save the record and repeat the process with the next user.