One of the many customizable features that makes Inventory IQ such a useful tool is the ability to organize transactions according to a job code. Job codes can be used in a variety of ways, such as:
- Billing consumables to project that they were used for
- Tracking consumption by department
Job codes are available to use when taking out items, returning unused items, or when borrowing an asset using the ISSUE TOOLS feature. Once you assign a job code, it will apply to all your transactions until you hit the SUBMIT button or until you change the transaction mode (e.g., from TAKE OUT ITEMS to RETURN ITEMS)
There are three ways to add a job code to a transaction:
- Direct input into scanner
- Scanning a pre-printed barcode
- Setting default job code when setting up USER or USER GROUP
Direct Input Method:
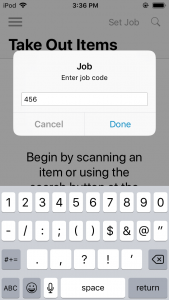
Any time during the use of the handheld scanner, you can add a job code simply by touching the blue text next to the search icon in the upper right corner. It will either say SET JOB or it will display the job code previously entered. Touching the blue text will bring up a form for inputting the new job code. Using the keypad below the form, type in your job code. You can use any alphanumeric string for your code, and it does not have to be unique. Select DONE to register the code and make transactions.
Any transaction you make while the job code is set will be assigned that code.
Bar Code Scanning Method:
If your job code strategy involves a finite number of codes, you can prepare them as bar codes that your users then can scan. This saves a lot of time and errors over inputting the codes manually as described above.
To prepare bar codes, the administrator will open the JOB CODES page in the desktop app and select ADD NEW JOB CODE.
The EDIT JOB CODE page provides two mandatory fields: Name and Code. You can use the same name for both fields, or you can make the code a simplified version of the name. The code is what will display on the scanner.
To print the barcodes, go back to the JOB CODES page and select the check boxes to the left of the codes you want to print. A PRINT LABELS button will appear once one or more of the boxes are checked. Click the button and a PDF will download which you can send to your printer. The PDF is formatted to print on AVERY 8160 labels or equivalent. You can post these bar codes inside your supply room for users to scan.
To use the bar codes, the user will scan the code before executing any transactions. Do not select the blue SET JOB text on the screen as you would in the direct input method above prior to scanning the code. Your assignment will be confirmed by displaying the JOB CODE on the top left of the scanner screen.
Setting Default Job Codes:
You can assign default codes to individual users or to user groups. If a user has a default job code assigned, this will trump the default code assigned to a user group that the user may be assigned to.
Group level
In the desktop app, the administrator will go to the USER GROUPS page to access
USER GROUP DETAILS page, either by selecting the edit icon next to an existing
user group or by selecting the ADD NEW GROUP button. In the USER GROUP DETAILS
page, there is a field to add the job code. Add the code, click SAVE, and
repeat with as many user groups as you wish. Once assigned, every transaction
by any user that has been assigned to this user group will have this job code
loaded as their default.
User level
In the desktop app, the administrator will go to the USERS page to access the
USER DETAILS page by selecting the edit icon next to each user. There is a
field on the USER DETAILS page for assigning the user to a user group as well
as a field for assigning the user a default job code. Make you changes and
select SAVE.
To summarize what will happen with job codes when a user picks up the scanner, here is the rundown: User picks up scanner and selects their user name. If the user belongs to a user group, the scanner will assign the job code that has been assigned by that user group. If the user has been assigned a default job code, the scanner will assign this job code to all transactions, even if the user belongs to a user group. If the user scans or directly inputs a job code into the scanner, this is the job code that will appear on subsequent transactions until the SUBMIT button is selected or the user changes to a different transaction mode.